What Does a Certified Collision Center Actually Mean?

Why Certification Matters More Than Most Drivers Realize

Not all collision repair shops are created equal.

After an accident, many car owners assume that any collision repair shop can fix their car. But with today’s advanced materials, electronics, and safety features, this assumption can result in costly errors.

This is where certified collision repair shops make a difference.

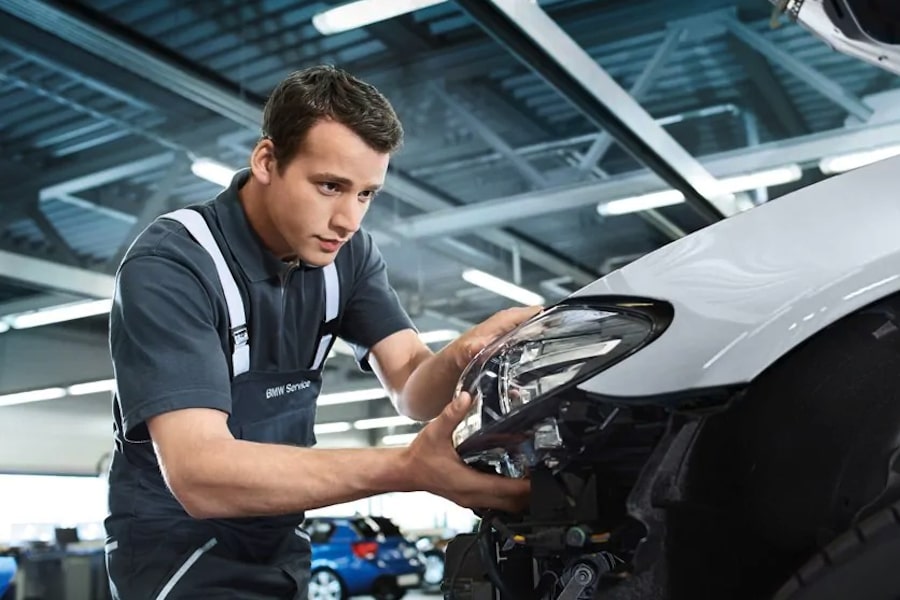
What is a certified collision repair shop?

A certified collision repair shop is a repair facility that has been trained, equipped, and authorized by car manufacturers to adhere to factory repair procedures. These certifications are not easily handed out. They involve a tremendous investment of equipment, training, and adherence to manufacturer requirements.

In essence, certification means that the shop is trusted to repair cars as the manufacturer intend.


What Certification Actually Involves

Becoming a certified repair facility requires far more than experience.

Manufacturers require:

• Specialized training for technicians
• Access to factory repair procedures
• Manufacturer-approved tools and equipment
• Advanced diagnostic and scanning systems
• Controlled refinishing environments
• Ongoing inspections and recertification

This ensures repairs are performed using the same standards applied at the factory level.

Without this level of preparation, critical repair steps may be missed — especially on modern vehicles.

Why Certification Matters Today

Mercedes-Benz, Tesla, BMW, Audi, Porsche, and other luxury brands are designed with the use of light alloys, high-strength steel, and complex electronics.

Today, many repairs include:

• Structural bonding and rivet processes
• ADAS calibrations
• Radar and camera adjustments
• Software diagnostics
• Advanced paint processes

These are not things that can be done on the fly.

They need to be done with proper documentation, the right tools, and experienced technicians who are familiar with the entire repair process.

The Safety Factor

It’s not just about quality; it’s about safety.

Today’s vehicles are designed as complete safety solutions. If they are not repaired in accordance with the manufacturer’s instructions, critical systems may not operate as intended in a future crash.

This includes:

• Airbag deployment sequencing
• Structural crash absorption
• Sensor accuracy
• Driver assistance systems

Correct repairs are about more than looks.
They are about safety.

The Anthony’s Auto Craft Standard

At Anthony’s Auto Craft, certification is part of our dedication to precision and accountability.

We adhere to the manufacturer’s repair methods, employ state-of-the-art diagnostic tools, and stay at the forefront of training and technology to keep pace with the ever-changing standards of vehicles on the road.

Each repair job is undertaken with one aim in mind:

To return the vehicle to manufacturer specifications—not approximate specifications.

Because in the business of collision repairs, certification is not a badge.

It’s a responsibility.

source https://www.anthonysautocraft.com/what-does-a-certified-collision-center-actually-mean/

OEM Parts vs Aftermarket Parts

What’s the Real Difference — and Why It Matters

Among the most critical steps that occur after a collision is the selection of the type of parts that will be used in the repair process.

The majority of car owners are never fully educated on the difference.

There are two main alternatives: OEM parts and aftermarket parts.

OEM (Original Equipment Manufacturer) parts are manufactured by the same company that manufactured the car. They are the same in design, materials, safety, and specifications as the original parts that were installed in the vehicle when it was manufactured.

Aftermarket parts are manufactured by third-party companies. Although they may appear similar, they are not manufactured with the same engineering specifications as the original car.

This is more significant than most people are aware of.

Headlight Replacement Service | Suntrup BMW of West St. Louis

Precision Engineering vs General Fit

The luxury car brands like Mercedes-Benz, Tesla, BMW, Audi, Porsche, and Rivian have designed their cars with very tight tolerances.

The body panels, headlights, structural parts, sensors, and mounting brackets are designed to fit together with millimeter accuracy. This is done to ensure correct aerodynamics, strength, and proper functioning of the safety features.

The OEM parts are manufactured with these same tolerances.

The aftermarket parts are designed to fit different variations of a car model. This may lead to:

• Slightly uneven panel gaps
• Additional time to “adjust” or modify parts
• Variations in material thickness
• Lack of corrosion protection
• Inconsistent mounting points for sensors

In luxury cars, even the slightest deviation may impact the look and performance of the vehicle.

An imperfectly mounted bumper may affect the radar alignment.
A misaligned headlight may let water inside.
A structural part that is not built to factory standards may impact the crashworthiness of the vehicle.

These deviations are not always immediately visible but are important in the long run.

Safety and Structural Integrity

OEM parts are tested for crash worthiness and approved by the manufacturer as part of a comprehensive safety system.

Aftermarket parts do not have to be tested to the same standards as the original equipment manufacturer parts.

If structural or safety-related components are replaced with aftermarket parts, the vehicle may not behave in the same manner in a subsequent crash.

For high-end vehicles with advanced driver assistance systems, precise mounting locations are essential. Sensors and cameras require precise location. If the mounting bracket or panel changes even slightly, the accuracy of calibration may be compromised.

Good repairs mean more than just looks, they mean safety.

Long-Term Value

Resale value is directly tied to repair quality.

Dealerships and informed buyers often inspect for:

• OEM part usage
• Proper fitment
• Paint consistency
• Structural integrity
• Electronic fault history

Vehicles repaired with non-OEM components may experience reduced trade-in value and lower buyer confidence.

What seems like a small cost difference during repairs can translate into a larger financial impact later.

source https://www.anthonysautocraft.com/oem-parts-vs-aftermarket-parts/

Why Cheap Body Work Can Decrease Your Car’s Value

The Hidden Cost of Cutting Corners on Collision Repairs

It is only natural to want the repair completed as soon as possible and at the lowest cost possible after an accident.

However, when it comes to high-end cars, the lowest-cost method of repairing the vehicle may end up quietly costing you a lot more down the road.

This is because today’s cars, especially high-end models such as Mercedes-Benz, Tesla, BMW, Audi, Porsche, and Rivian, are designed with very tight tolerances and the latest materials and safety features. These cars are simply not meant to be repaired with the cheapest methods.

However, this is exactly what many of these low-cost shops do.

At first, the car looks just fine.

It has been repainted, and all the dings and dents are hidden.

The panels are straight.

However, over time, the differences become apparent.

The paint may begin to fade and peel from improper preparation.
The panels may not be perfectly aligned.
The body lines may appear slightly “off” in the sunlight.
The wind noise may increase due to improper alignment.
And the safety features may never be properly recalibrated.

These are the small details that car dealerships, appraisers, and buyers notice right away.

And these details have a direct impact on your vehicle’s value.

Where Cheap Repairs Cut Corners

Budget repairs will usually cut costs by settling for process and material compromises.

This may involve:

• Low-quality or aftermarket components
• Little disassembly before painting
• Skipping steps to protect against corrosion
• Touching up paint instead of proper refinishing
• Reusing brackets or clips that are damaged
• Skipping sensor calibrations and scans

These cuts aren’t always immediately apparent — but they’ll manifest themselves in months to come.

Paint will begin to yellow. The clear coat will fail. The parts will come loose. The warning lights will come on. Or, worse yet, the car simply won’t protect its occupants as it was intended to.

Luxury cars demand precision, not approximation.

“Good enough” simply isn’t good enough.

Orange Peel on Car Paint | Causes and How to Fix Paint Orange Peel

The Resale & Trade-In Reality

Dealerships and buyers understand what quality repairs entail.

When inspecting, they look at:

• Panel gaps
• Paint consistency
• Texture and finish
• Overspray
• Correct part installation
• Electronic trouble codes

Poor repairs erode confidence – and confidence is a factor in value.

A car that takes shortcuts or uses non-OEM parts can depreciate by thousands of dollars in resale or trade-in value.

What appeared to be a savings now becomes a larger loss.

source https://www.anthonysautocraft.com/why-cheap-body-work-can-decrease-your-cars-value/

The Hidden Technology Behind Modern Bumpers

In today’s luxury vehicles, the bumper is no longer just an exterior panel.

It is a structural and electronic mounting platform engineered to support advanced safety systems designed to operate within extremely tight tolerances.

Manufacturers such as Mercedes-Benz, Tesla, BMW, Audi, Porsche, Rivian, and other premium brands integrate radar modules, ultrasonic sensors, forward-facing cameras, and adaptive cruise components directly behind the bumper and grille assemblies. These systems form part of the vehicle’s Advanced Driver Assistance Systems (ADAS) – technology built to actively prevent collisions.

BKM Turbo Style Front Bumper with LED Daylights, fits Porsche Cayenne 958.1 - BK-Motorsport

What many vehicle owners don’t realize is this:

Even a minor impact can compromise these systems.

A radar sensor misaligned by only a few millimeters can miscalculate distance.
A distorted mounting bracket can alter detection angles.
Improper reinstallation torque can affect calibration accuracy.

The vehicle may look perfectly repaired.
The paint may be flawless.
But if factory procedures are not followed precisely, the safety systems may not perform as designed.

Luxury manufacturers publish detailed collision repair procedures that require:

• Pre-repair diagnostic scanning
• Careful removal and handling of radar and camera parts
• Examination of sensor brackets and mounting areas
• Strict torque values during reinstallations
• Static and dynamic calibration with approved manufacturer tools
• Post-repair verification scans

These calibrations may demand level floors, accurate target board positioning, specific lighting conditions, and sophisticated diagnostic software. This procedure cannot be estimated or approximated.

It must be measured and verified to the manufacturer’s specifications.

Dealer-level certified repair shops follow these procedures to the letter. There is no assumption or shortcut.

At Anthony’s Auto Craft, each bumper repair is considered a complete restoration of the entire safety system. We conduct thorough pre- and post-repair scanning, check for structural and mounting integrity, and verify that all radar and camera systems are accurately calibrated before final delivery.

Because in today’s high-end autos, precision is not about looks.

source https://www.anthonysautocraft.com/the-hidden-technology-behind-modern-bumpers/

All-Wheel Drive Winter Performance

Essential Information About All-Wheel Drive Winter Performance For Ski Trips

All-wheel-drive (AWD) systems provide winter road trip drivers to Lake Tahoe with better vehicle control. Drivers mistakenly believe that AWD systems provide full snow and ice driving capabilities during winter months. This behavior results in accidents that could have been avoided together with damage to vehicles.

The guide will explain how all-wheel drive systems operate in winter weather conditions and what equipment needs to be brought to the mountains together with vehicle protection methods against snow damage.

Fun in the Snow: 12 Coolest All-Wheel Drive Sleds for the Winter

1. What All-Wheel Drive Actually Does (and Doesn’t Do)

AWD helps distribute power to all four wheels, which improves traction on slippery surfaces that include snow and slush and ice. Drivers find it easier to start from a stationary position while ascending snowy hills because this system enables their vehicles to operate properly.

The system does not provide any benefit to your braking and turning abilities on icy roads because it does not help your driving abilities. Your stopping power and cornering grip come almost entirely from your tires. The advanced all-wheel drive systems need tires that can maintain contact with the surface in order to function properly.

Key takeaway: The system provides forward movement because it does not assist you with stopping activities.

2. Tires: The Most Important Factor in Winter Safety

  • Drivers need to focus more on their tire selection than on their drivetrain selection.
  • All-season tires operate as a mid-range solution because they provide some snow driving capability but their performance decreases in cold weather and icy conditions.
  • Winter tires use rubber materials which create flexible tread designs that enable drivers to maintain control on cold pavement and snow and ice surfaces.

The Sierra Nevada region requires drivers to use tire chains or cables during severe weather conditions which impose restrictions on all-wheel-drive vehicles.
People who visit Tahoe multiple times each winter season should purchase a specific set of winter tires. At minimum drivers need to carry chains which should be tested for vehicle compatibility before their journey begins.

3. Driving Tips for Snowy Mountain Roads

  • Your driving habits determine your ability to drive through snowy conditions more than your all-wheel-drive system.
  • You should use gentle acceleration because it helps you prevent wheel spin.
  • You should brake at an early point with a light braking force.
  • Drivers need to establish greater space between their vehicles for safe driving.
  • Drivers should maintain their steering wheel position without making fast steering movements.
  • You should downshift when you drive down long slopes instead of using your brakes continuously.
  • Drivers should use their vehicle’s lower drive modes or Snow Mode if their vehicle includes that feature.

Pro tip: Drive as if you don’t have AWD. It will keep you smoother, safer, and more in control.

4. Protecting Your Paint From Winter Damage

  • Mountain areas experience severe winter road conditions which damage car exteriors because of the heavy use of salt and sand and gravel.
  • The most common risks that drivers face include:
  • Paint chips from flying gravel
  • Salt corrosion on lower panels and undercarriage
  • Fading or dull clear coat from chemical exposure

How to protect your vehicle:

  • You need to apply ceramic coating or paint protection film (PPF) for high-impact areas which include front bumper and hood and mirrors and rocker panels.
  • You should wash your vehicle immediately after you return to your home because it helps you eliminate salt residue.
  • You should direct your cleaning efforts toward wheel wells and brakes and underbody areas.

5. Suspension, Alignment, and Undercarriage Care

Snow covers potholes and road edges and uneven pavement. A single hard impact can lead to alignment problems or suspension part failures.

The following conditions require your attention:

  • Your vehicle starts to move toward one side after you complete your journey.
  • Drivers should watch for different patterns of tire wear.
  • New noises over bumps
  • Steering wheel vibration

Post-trip recommendation:
You should have both your alignment and suspension system checked after driving through winter conditions because you might have encountered hazardous areas which were obscured by snow.

source https://www.anthonysautocraft.com/all-wheel-drive-winter-performance/

How to Clean Car Seats: Best Practices for Leather, Fabric, and More

Maintaining clean car interiors can significantly impact both the appearance and value of your vehicle. Many car owners struggle with proper seat cleaning techniques, unsure which products are safe and effective for different upholstery materials. Seeking professional repair services in San Rafael might be worthwhile for deep cleaning or addressing stubborn stains, but regular maintenance can be easily handled at home with the right approach. This guide explores effective cleaning methods for various seat materials—from leather and fabric to vinyl and alcantara—helping you preserve your car’s interior condition while extending the lifespan of your upholstery.


Leather Car Seats Cleaning Tips

Let’s start by gathering the necessary supplies for cleaning leather car seats. To effectively clean leather, we’ll need a vacuum cleaner with a brush attachment, a microfiber cloth, leather cleaner, leather conditioner, and a soft-bristled brush. Start by vacuuming the seats to remove any debris. Next, dampen the microfiber cloth with the leather cleaner and gently wipe down the seats to remove dirt and stains. For stubborn stains, use a soft-bristled brush in a circular motion. Once the seats are clean, apply a leather conditioner to keep the leather supple and prevent cracking. Remember to follow the manufacturer’s instructions for the specific products you are using to ensure the best results for your leather car seats.

Fabric Car Seats Cleaning Guide

To effectively clean fabric car seats, gather the necessary supplies such as a vacuum cleaner with a brush attachment, upholstery cleaner, a microfiber cloth, a soft-bristled brush, and a bucket of warm water. Start by vacuuming the seats thoroughly to remove any loose debris. Next, mix the upholstery cleaner with warm water according to the manufacturer’s instructions. Test the cleaner on a small, inconspicuous area first to verify it doesn’t damage the fabric. Using the soft-bristled brush, gently scrub the solution onto the seats, focusing on any stains or heavily soiled areas. Once done, wipe the seats with a damp microfiber cloth and allow them to air dry completely. Regular maintenance and prompt cleaning can help maintain the quality of your fabric car seats.

Cleaning Other Upholstery Types

When dealing with upholstery types other than fabric in car seats, specific approaches are necessary for optimal results. For vinyl upholstery, start by vacuuming thoroughly, then use a mild soap and water solution to gently clean the surface. Avoid harsh chemicals that may cause discoloration or deterioration of the vinyl. Suede or alcantara upholstery requires more delicate handling—a soft-bristled brush can help remove surface dirt and stains without damaging the nap. Always check the manufacturer’s recommendations for cleaning these sensitive materials to preserve their appearance and texture. Using the wrong cleaning agents can permanently damage specialty upholstery, so when in doubt, consult your vehicle’s manual or a professional detailer.

Removing Stains and Spills

When tackling stains and spills on car seats, it is essential to act promptly to prevent them from setting and becoming more difficult to remove. For fabric seats, start by absorbing excess liquid with a clean cloth. Then, mix a solution of mild detergent and water, gently scrub the stain, and blot with a dry cloth. For leather seats, wipe spills immediately with a soft cloth to prevent staining. Use a leather cleaner or a mixture of vinegar and water for tougher stains, but always test in a hidden area first. Grease stains can be treated with baking soda or cornstarch to absorb the oil. Remember, different materials require specific treatments, so always check the manufacturer’s recommendations for the best results.

Eliminating Odors and Refreshing Seats

If you’ve successfully addressed stains and spills on your car seats, the next step is to deal with any lingering odors and revitalize the seats for a clean and pleasant driving experience. To eliminate odors, start by thoroughly vacuuming the seats to remove any debris that may be causing the smell. Next, sprinkle baking soda on the seats, let it sit for a few hours to absorb odors, then vacuum it up. For a revitalizing touch, consider using a fabric refresher spray or a mixture of water and a few drops of essential oils like lavender or eucalyptus. Make sure the seats are completely dry before sitting on them. These steps will not only eliminate odors but also leave your car seats feeling and smelling fresh.


Other Related Posts:

source https://www.anthonysautocraft.com/how-to-clean-car-seats-best-practices-for-leather-fabric-and-more/

How to Clean Headlights: A Step-by-Step Guide for Brighter Lights

Dirty or foggy headlights not only diminish your vehicle’s appearance but also create serious safety hazards by reducing visibility during night driving. Many car owners don’t realize that headlight restoration is a simple maintenance task they can perform at home with the right supplies and techniques. Just as you would trust a reliable auto body repair shop for major vehicle damage, you can trust this comprehensive guide to help you restore clarity to your headlights. The following steps will walk you through the entire process—from gathering supplies to applying protective sealant—ensuring your headlights provide maximum illumination for safer driving conditions.


Gather Necessary Supplies

Let’s begin by gathering all the supplies needed for cleaning the headlights. First, we need a microfiber cloth to wipe away dirt and grime. Next, grab some masking tape to protect the surrounding areas of the headlights from accidental scratches during the cleaning process. You’ll also need a bucket of warm soapy water and a separate bucket of clean water for rinsing. To polish the headlights, have a headlight restoration kit ready, which usually includes sandpaper of varying grits and a polishing compound. Don’t forget to wear protective gloves and safety glasses to shield your hands and eyes from any chemicals. Once all these supplies are assembled, we’re ready to move on to preparing the headlight cleaning solution.

Prepare Headlight Cleaning Solution

To create the headlight cleaning solution, mix a small amount of dish soap with warm water in a bucket until suds form. The dish soap helps break down grime and dirt on the headlights effectively. Make sure the water is warm but not too hot to avoid damaging the headlights. Stir the mixture gently to combine the soap and water thoroughly. The warm soapy solution will aid in softening tough stains and debris on the headlights’ surface, making them easier to clean later. Remember not to use abrasive cleaners or chemicals that could harm the headlights. This simple yet powerful solution is the first step towards achieving clearer and brighter headlights for your vehicle.

Apply Solution to Headlights

Carefully pour the prepared cleaning solution onto the headlights, ensuring complete coverage of the surface. Using a clean microfiber cloth, gently rub the solution onto the headlights in circular motions. This action helps to break down and remove stubborn dirt, grime, and oxidation from the headlight surface. Pay extra attention to any areas with heavy buildup and make sure they receive thorough coverage. After applying the solution, allow it to sit for a few minutes to effectively penetrate and lift the debris. This step is crucial in preparing the headlights for the next phase of the cleaning process. Proper application of the solution is key to achieving optimal results in headlight restoration.

Polish Headlights for Shine

For achieving a glossy finish, utilizing a quality headlight polish is vital. Begin by applying a small amount of polish onto a clean microfiber cloth. Using gentle circular motions, work the polish into the headlight surface. Make sure that the entire headlight is covered evenly. Continue polishing until the surface feels smooth and any remaining foggy areas disappear. It’s important to follow the specific instructions provided by the polish manufacturer to achieve the best results. Once the polishing is complete, inspect the headlights under proper lighting to confirm a uniform shine. Remember, the key to a brilliant finish lies in patience and thoroughness. Now that your headlights are polished to perfection, it’s time to seal them for long-lasting protection.

Seal Headlights for Protection

A protective sealant is essential to safeguard the headlights from environmental elements and maintain their pristine appearance over time. It creates a barrier that shields the headlights from UV rays, dirt, and other contaminants that can cause damage. To effectively seal headlights, follow these steps:

  • Clean the Headlights: Make sure the headlights are thoroughly cleaned and dried before applying the sealant.
  • Apply the Sealant: Use a microfiber cloth to apply a quality UV-resistant sealant evenly on the headlights.
  • Buff and Polish: After the sealant has dried, buff the headlights with a clean cloth to remove any excess product.
  • Repeat Regularly: Reapply the sealant every few months to ensure long-lasting protection and clarity.


Other Related Posts:

source https://www.anthonysautocraft.com/how-to-clean-headlights-a-step-by-step-guide-for-brighter-lights/

How to Wax a Car: Step-by-Step Guide for a Perfect Shine

Maintaining your vehicle’s appearance requires regular care and attention to detail. While many drivers focus on keeping their cars clean, adding a protective layer of wax creates that enviable showroom shine while safeguarding the paint from environmental damage. Just as exceptional auto body repair requires professional knowledge and technique, proper waxing follows specific steps to achieve optimal results. This comprehensive guide breaks down the waxing process into manageable stages, from preparation to final buffing, helping you achieve a professional-quality finish that enhances your vehicle’s appearance and preserves its value.


Gather Your Supplies

Before starting the waxing process, we need to make sure we have all the necessary supplies gathered and ready for use. The key items required are a high-quality car wax, a set of clean and soft microfiber cloths, an applicator pad, and a detailing spray. It’s important to choose a wax that suits your car’s specific paint type to ensure the best results. The microfiber cloths should be free of any debris to prevent scratches during application. An applicator pad helps to evenly distribute the wax, while the detailing spray is useful for prepping the car’s surface. By having these supplies organized and within reach, we can proceed with the waxing process efficiently and effectively, paving the way for a flawless finish.

Wash and Dry Your Car

To accomplish a pristine wax finish, thoroughly washing and drying the car is crucial. Begin by rinsing the car with a hose to eliminate loose dirt and debris. Next, using a high-quality car wash soap and a soft microfiber wash mitt, gently scrub the entire surface of the car to eliminate stubborn dirt and grime. Rinse off the soap thoroughly to ensure no residue is left behind. To prevent water spots, dry the car using a clean microfiber towel, starting from the top and working your way down. Pay special attention to crevices and door jambs where water can hide. Ensuring the car is completely clean and dry sets the foundation for a flawless wax application.

Apply the Wax

We carefully select a high-quality car wax product that suits the vehicle’s paint type and condition. Before applying the wax, make sure the car is cool to the touch and parked in a shaded area. Using an applicator pad or microfiber cloth, apply a small amount of wax in a thin, even layer to a small section of the car’s surface. Work the wax into the paint using circular motions, ensuring complete coverage. Take care not to apply wax to rubber or plastic trim pieces. Once applied, allow the wax to dry to a haze, typically for about 10-15 minutes, depending on the product. This step is essential for protecting the paint and achieving a deep, long-lasting shine.

Buff the Wax

Once the wax has dried to a haze, it is time to buff the surface to a brilliant shine. Here’s how to achieve that perfect finish:

  1. Prep the Buffing Pad: Make sure the buffing pad is clean and free of any debris that could scratch the surface.
  2. Apply Even Pressure: Use a firm, consistent pressure when buffing to evenly distribute the wax and avoid swirl marks.
  3. Circular Motions: Buff the wax in small circular motions, overlapping each pass slightly to ensure full coverage.
  4. Check for Uniform Shine: Regularly inspect the surface as you buff to secure a uniform shine without any dull spots.

Following these steps with precision will result in a glossy, showroom-worthy finish.

Finish With a Final Shine

Achieving a flawless ultimate gleam on your car’s waxed surface requires meticulous attention to detail and a methodical approach. Once the wax has been buffed to perfection, it’s time to enhance the shine to its fullest potential. Using a clean microfiber cloth, we delicately buff the surface in small, circular motions. This step helps to eliminate any remaining residue and further improves the gloss. Next, we examine the surface under different lighting conditions to capture any imperfections that may have been overlooked. Any dull spots or streaks are carefully attended to with a gentle touch. Finally, a final once-over with a fresh microfiber cloth ensures a mirror-like finish that reflects your commitment to a flawlessly waxed car.


Other Related Posts:

source https://www.anthonysautocraft.com/how-to-wax-a-car-step-by-step-guide-for-a-perfect-shine/

How to Buff Out Scratches on Car: Tips and Techniques You Need to Know

Finding scratches on your vehicle can be frustrating, especially when they affect your car’s appearance and potentially its resale value. While deep scratches may require attention from a professional auto repair shop, many surface-level scratches can be addressed with the right tools and techniques at home. This guide walks you through a step-by-step process for evaluating scratch severity, preparing the affected area, and applying effective buffing methods to restore your car’s finish. With some patience and careful application, you can often achieve impressive results that dramatically improve your vehicle’s appearance.


Assessing the Scratch Severity

Let’s first examine the scratch severity by carefully inspecting the depth and length of the damage on the car’s surface. Scratches can vary in severity, from light surface scratches that barely penetrate the clear coat to deep scratches that expose the metal underneath. To assess the severity accurately, use a bright light source to illuminate the scratch at different angles. Look for any signs of paint transfer or raised edges, indicating a deeper scratch. Measure the length and width of the scratch to determine the extent of the damage. Understanding the severity of the scratch is essential in selecting the appropriate tools and techniques for effective repair.

Gathering the Necessary Tools

To proceed with addressing the scratches on the car, the first step is to gather the necessary tools for the repair process. Ensuring you have the right tools will help you effectively buff out the scratches on your vehicle. Here are the essential items you will need:

  1. Microfiber Cloths: These are soft, lint-free cloths that are ideal for wiping and polishing the car’s surface without causing additional scratches.
  2. Car Scratch Remover: Choose a high-quality scratch remover that matches the severity of the scratches on your car.
  3. Dual Action Polisher: A dual action polisher will help you evenly apply the scratch remover and polish the affected area for a smooth finish.

Preparing the Surface for Buffing

Before buffing out the scratches on your car, it is important to prepare the surface adequately for the repair process. Start by thoroughly washing and drying the affected area to remove any dirt or debris that could interfere with the buffing. Next, tape off any adjacent areas to protect them from accidental damage during the buffing process. Inspect the scratches closely to determine their depth and extent, as this will guide you in selecting the appropriate buffing compound and technique. Consider using a clay bar to further clean and smooth the surface before buffing. Ensuring the surface is clean, dry, and properly prepped will help achieve the best results when buffing out scratches on your car.

Applying the Buffing Compound

Begin by applying a small amount of buffing compound onto a clean, soft microfiber cloth. This step is pivotal in the scratch removal process as the compound helps to gently abrade the surface, leveling out imperfections and restoring the shine to your car’s paintwork. Here are three key points to keep in mind when applying the buffing compound:

  1. Apply with Light Pressure: Gently rub the compound onto the scratched area using circular motions. Avoid pressing too firmly, as this could cause further harm to the paint.
  2. Work in Small Sections: Focus on one small area at a time to ensure thorough coverage and effective scratch removal.
  3. Spread Evenly: Make sure the compound is evenly dispersed on the cloth to prevent streaks or uneven results.

Polishing and Finishing Touches

Let’s now explore the final steps of the scratch removal process by addressing polishing and applying finishing touches to the treated area. After buffing out the scratches with a compound, the next critical step is to polish the area to restore a smooth and glossy finish. Use a clean microfiber cloth and a high-quality polish specifically designed for automotive surfaces. Apply the polish in circular motions, working it into the affected area until the scratches are no longer visible. Once the polishing is complete, it’s vital to apply a protective wax or sealant to ensure long-lasting shine and protection against environmental elements. This final touch not only enhances the appearance but also safeguards the treated area from future damage.


Other Related Posts:

source https://www.anthonysautocraft.com/how-to-buff-out-scratches-on-car-tips-and-techniques-you-need-to-know/

How to Clean Inside of Windshield: Common Mistakes to Avoid

Maintaining clear visibility through your windshield is essential for safe driving, yet many vehicle owners struggle with effectively cleaning the inside glass surface. The interior windshield collects oils, dust, and residue that can create dangerous glare, especially during night driving or when facing direct sunlight. While some motorists attempt DIY solutions, others seek professional help from a trusted body shop in San Rafael where specialists use proper techniques and appropriate products. This guide outlines the most common mistakes people make when cleaning their interior windshield and provides practical advice for achieving streak-free results that improve driving safety.


Using Incorrect Cleaning Products

When cleaning the inside of your windshield, it is important to avoid using incorrect cleaning products to prevent damage or streaks. To maintain clarity and visibility, choose a glass cleaner specifically formulated for automotive use. Avoid household cleaners that may contain ingredients harmful to the windshield’s surface, such as ammonia or bleach. Microfiber cloths are ideal for cleaning, as they are gentle and effective at removing dirt and grime without leaving lint behind. Spray the cleaner directly onto the cloth to control the amount used and prevent overspray onto the dashboard. Work methodically from top to bottom, ensuring complete coverage. Regular cleaning with the proper products will keep your windshield crystal clear for best driving visibility.

Not Properly Ventilating the Car

Properly ventilating the car while cleaning the inside of the windshield is crucial to ensure the cleaning process is effective and to prevent the accumulation of fumes or residue inside the vehicle. Failing to establish adequate ventilation can result in cleaning products’ fumes lingering in the enclosed space, potentially causing discomfort or health issues. To ventilate the car effectively, open all windows and doors to create a cross breeze. This will help dissipate any odors and ensure proper air circulation. Moreover, using a fan to blow air out of the vehicle can expedite the process. By ventilating the car properly, you can create a safer and more comfortable environment for the cleaning process.

Cleaning in Direct Sunlight

To achieve optimal outcomes, avoid cleaning the inside of the windshield in direct sunlight to prevent streaks and product residue. Direct sunlight can cause the cleaning solution to dry too quickly, leaving behind streaks and a hazy film on the windshield. When working in direct sunlight, the heat can also make it challenging to properly buff out the cleaning product, leading to an uneven finish. To avoid these issues, choose a shaded area or address the task early in the morning or late in the evening when the sun is less intense. By cleaning the inside of the windshield in ideal conditions, you can ensure a streak-free, crystal-clear result that enhances visibility while driving.

Neglecting to Wipe Away Residue

Always remember to thoroughly wipe away any residue left behind after cleaning the inside of the windshield to secure a clear and streak-free finish. Residue can accumulate from the cleaning solution evaporating too quickly or from not using enough microfiber cloths to remove all the dirt and grime. To secure a pristine windshield, take the time to inspect the glass after cleaning. Look for any streaks, smudges, or leftover residue. If any are found, use a clean microfiber cloth and a bit of glass cleaner to gently wipe away the remaining residue. Remember, a meticulous approach to wiping away residue is key to achieving a crystal-clear windshield that enhances visibility and driving safety.

Rushing Through the Cleaning Process

When discussing the cleaning process, it is vital to highlight the harmful effects that haste can have on the outcome of our windshield cleaning efforts. When we hurry, we risk overlooking areas on the windshield, leaving behind streaks and smudges that obstruct visibility. Rapidly wiping the glass can also scatter dirt and grime around instead of effectively eliminating it. Furthermore, skipping steps like preparing the surface or using the appropriate cleaning products can result in unsatisfactory outcomes. To guarantee a crystal-clear windshield, it is essential to approach the cleaning process systematically and patiently. Taking the time to clean thoroughly will ultimately produce a spotless windshield that enhances both the look of the car interior and the driver’s visibility.


Other Related Posts:

source https://www.anthonysautocraft.com/how-to-clean-inside-of-windshield-common-mistakes-to-avoid/